This crooked house

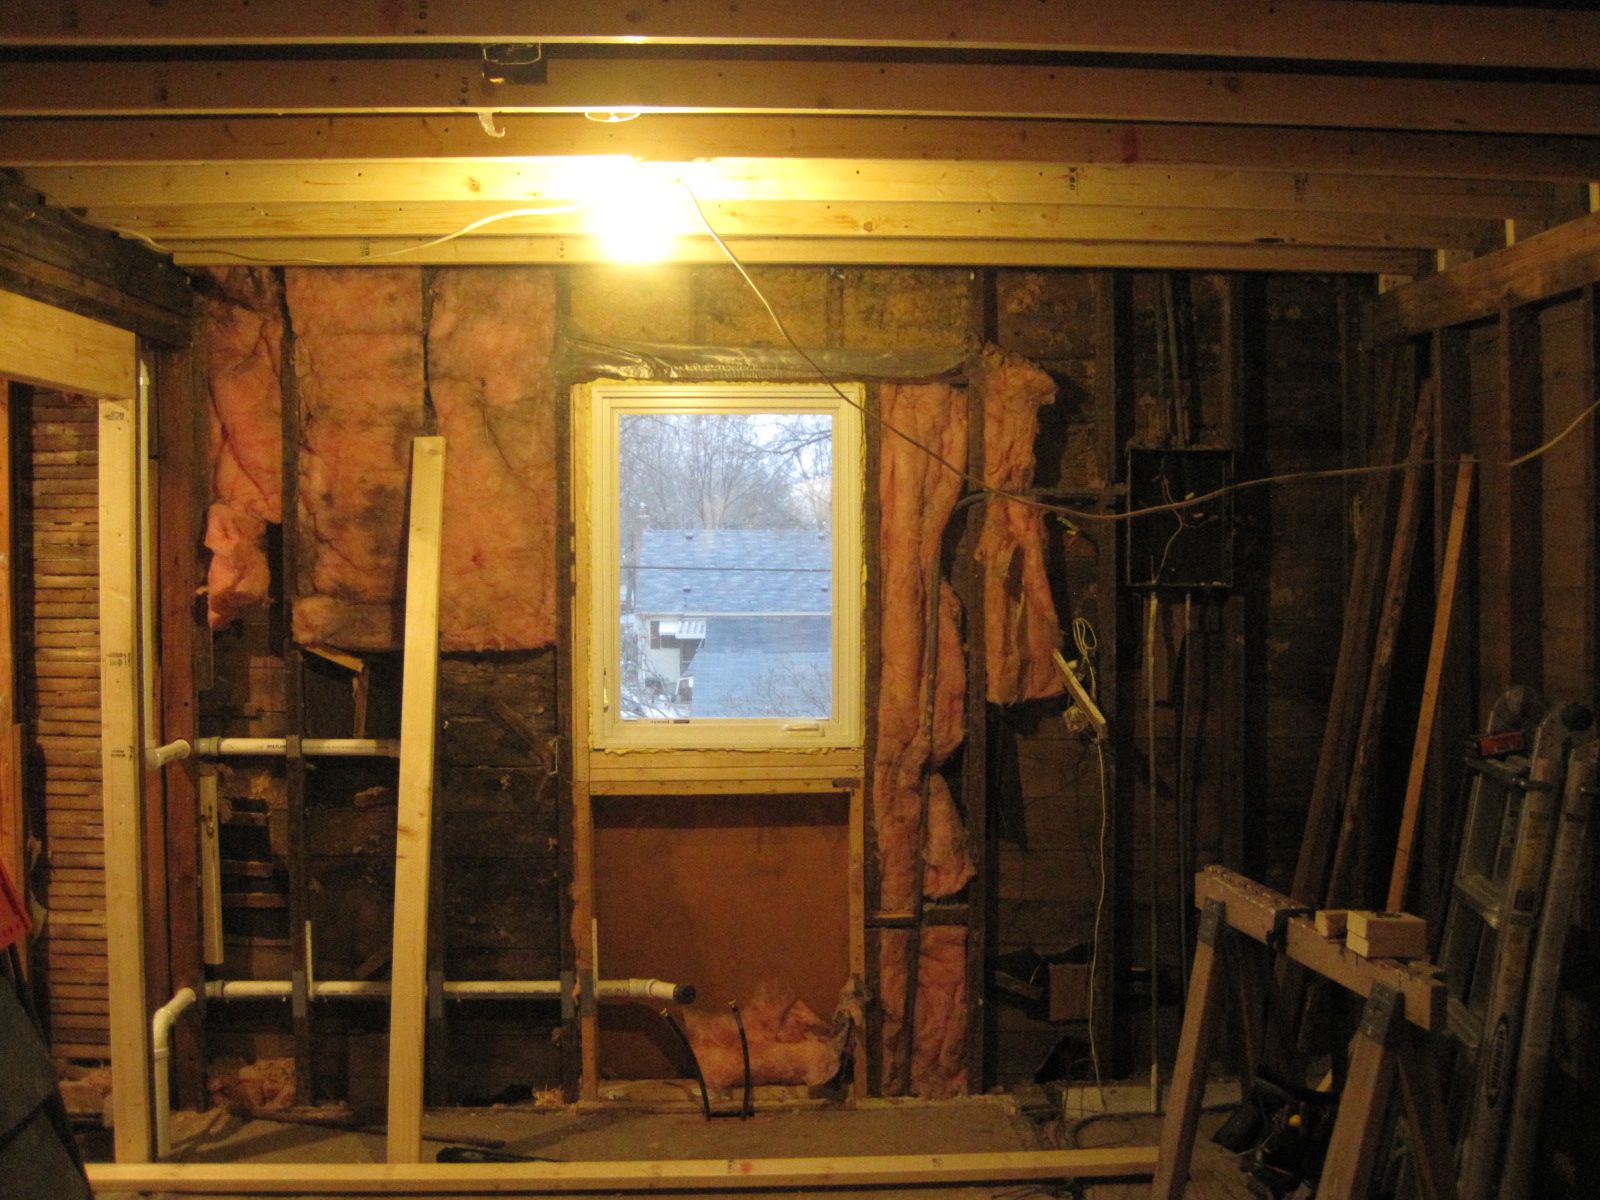
The ceiling after being leveled, now matches the lines of the new window and we no longer feel off balance when walking around in this room.

The ceiling after being leveled, now matches the lines of the new window and we no longer feel off balance when walking around in this room.

The plan was to unify the kitchen and dining room by making a common ceiling, leveling out any non-uniformities from the original framed building.  The tilted ceiling could be shimmed level and a single layer of sheetrock would provide a new and clean visual reference.

To do this, one must know what is level.  The familiar tool for this is the carpenter’s bubble level, but this is vastly inferior to the modern tool for this purpose: the laser level.  This is an electro-optical-mechanical device that is placed on a tripod and powered up.  After a few moments where it determines the local gravitational vectors, it fires up its laser beam and scans it at high speed 360-degrees around, drawing an evanescent red pencil line across every stud and wall section in the room.

The carpenter uses this reference line and measures to the existing ceiling to find out the thickness of the shims he must cut.  Normally a variation of an inch or so is easily accommodated.  In the case of This Odd House however, the carpenter found that the kitchen ceiling was tilted not just front to back (we already knew this from the skewed soffit we had removed from the previous remodeling), but also side to side.  And the dining room continued the tilt.  It was as if the original construction workers, making a flat roofed building that needed to drain to one corner, had also made the interior ceiling drain that way too.

The amount of shift needed to make the entire ceiling level exceeded four inches and would have required specialty techniques and materials (which I understood to translate to specialty expense).

We devised a plan B.  Only the kitchen ceiling would be leveled.  The dining room was on its own to be visually isolated by a cosmetic soffit, the construction of which remains to be determined.

Posted in Uncategorized | 3 Comments

Urban Archaeology

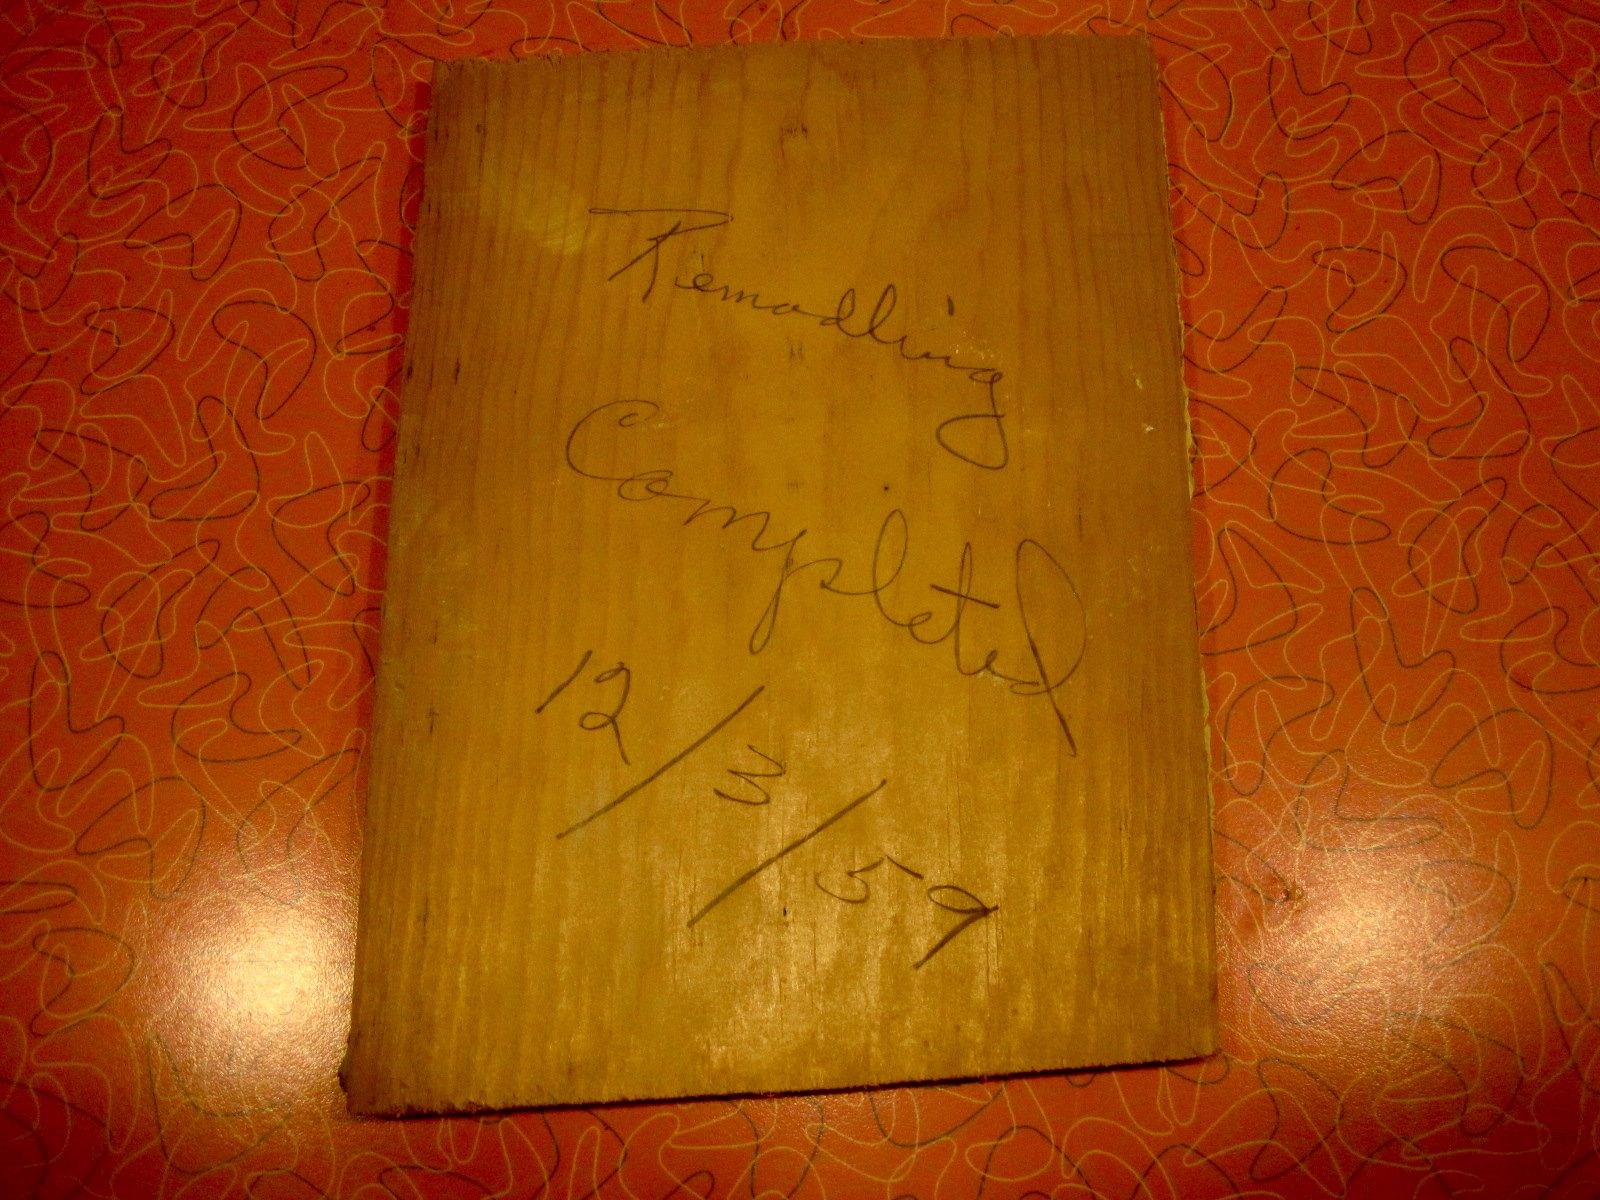
The declaration of remodeling by prior owners.

The declaration of remodeling by prior owners.

When the kitchen and bathroom walls were demolished, we found artifacts of their prior remodeling periods.  The previous owners had a terrific sense of style.  Their construction skills were not as strong, but they deliberately left clues for the archeologists that would follow (that’s me) to enjoy.  I described one such encounter with hidden artifacts in an earlier post.

Buried in the upstairs kitchen walls was an envelope, clearly intended for a future discoverer.  I expected a set of plans or some other arcane set of detailed information or specifications.  Instead, I get to page through a copy of Minneapolis City Pages from 1986, and a Life magazine from 1985.

City Pages 1986

City Pages 1986

Brooke Shields, highlighed in Life Magazine, 1985

Brooke Shields, highlighed in Life Magazine, 1985

Unfortunately, I’m old enough to remember these issues!  This is not the time-capsule experience that the originators intended I’m sure.  Even so, it is a pleasant surprise to encounter them.

There were other discoveries.  In one wall newspapers were stashed that relayed news of the major earthquake that had just happened in California (1989).   Handwritten messages clearly indicated the dates that the remodeling construction was happening.

October 18, 1989

October 18, 1989

In yet another location, a plaque declaring an even earlier remodeling effort was discovered.  This one marks an event that happened more than fifty years back, halfway between original construction and now.  I will need to do a little more research to learn what it refers to; it could be the conversion from store to duplex, maybe when the mansard roof was added as an architectural feature.

The wooden testament from a remodeling project in 1959, exactly 53 years earlier to the day of this posting.

The wooden testament from a remodeling project in 1959, exactly 53 years earlier to the day of this posting.

I wonder what I should leave behind.  I have some old copies of newspapers I have collected over the years.  Would it be too confusing for someone  thirty or forty years hence to encounter newspapers showing the moon landing, inside construction whose city permits were issued in 2012?  No, that would just encourage the moon landing conspiracy nuts.

Still, it is an opportunity for the next time capsule.  What would YOU embed in the new walls?

Posted in Uncategorized | 5 Comments

Technology comes, technology goes.

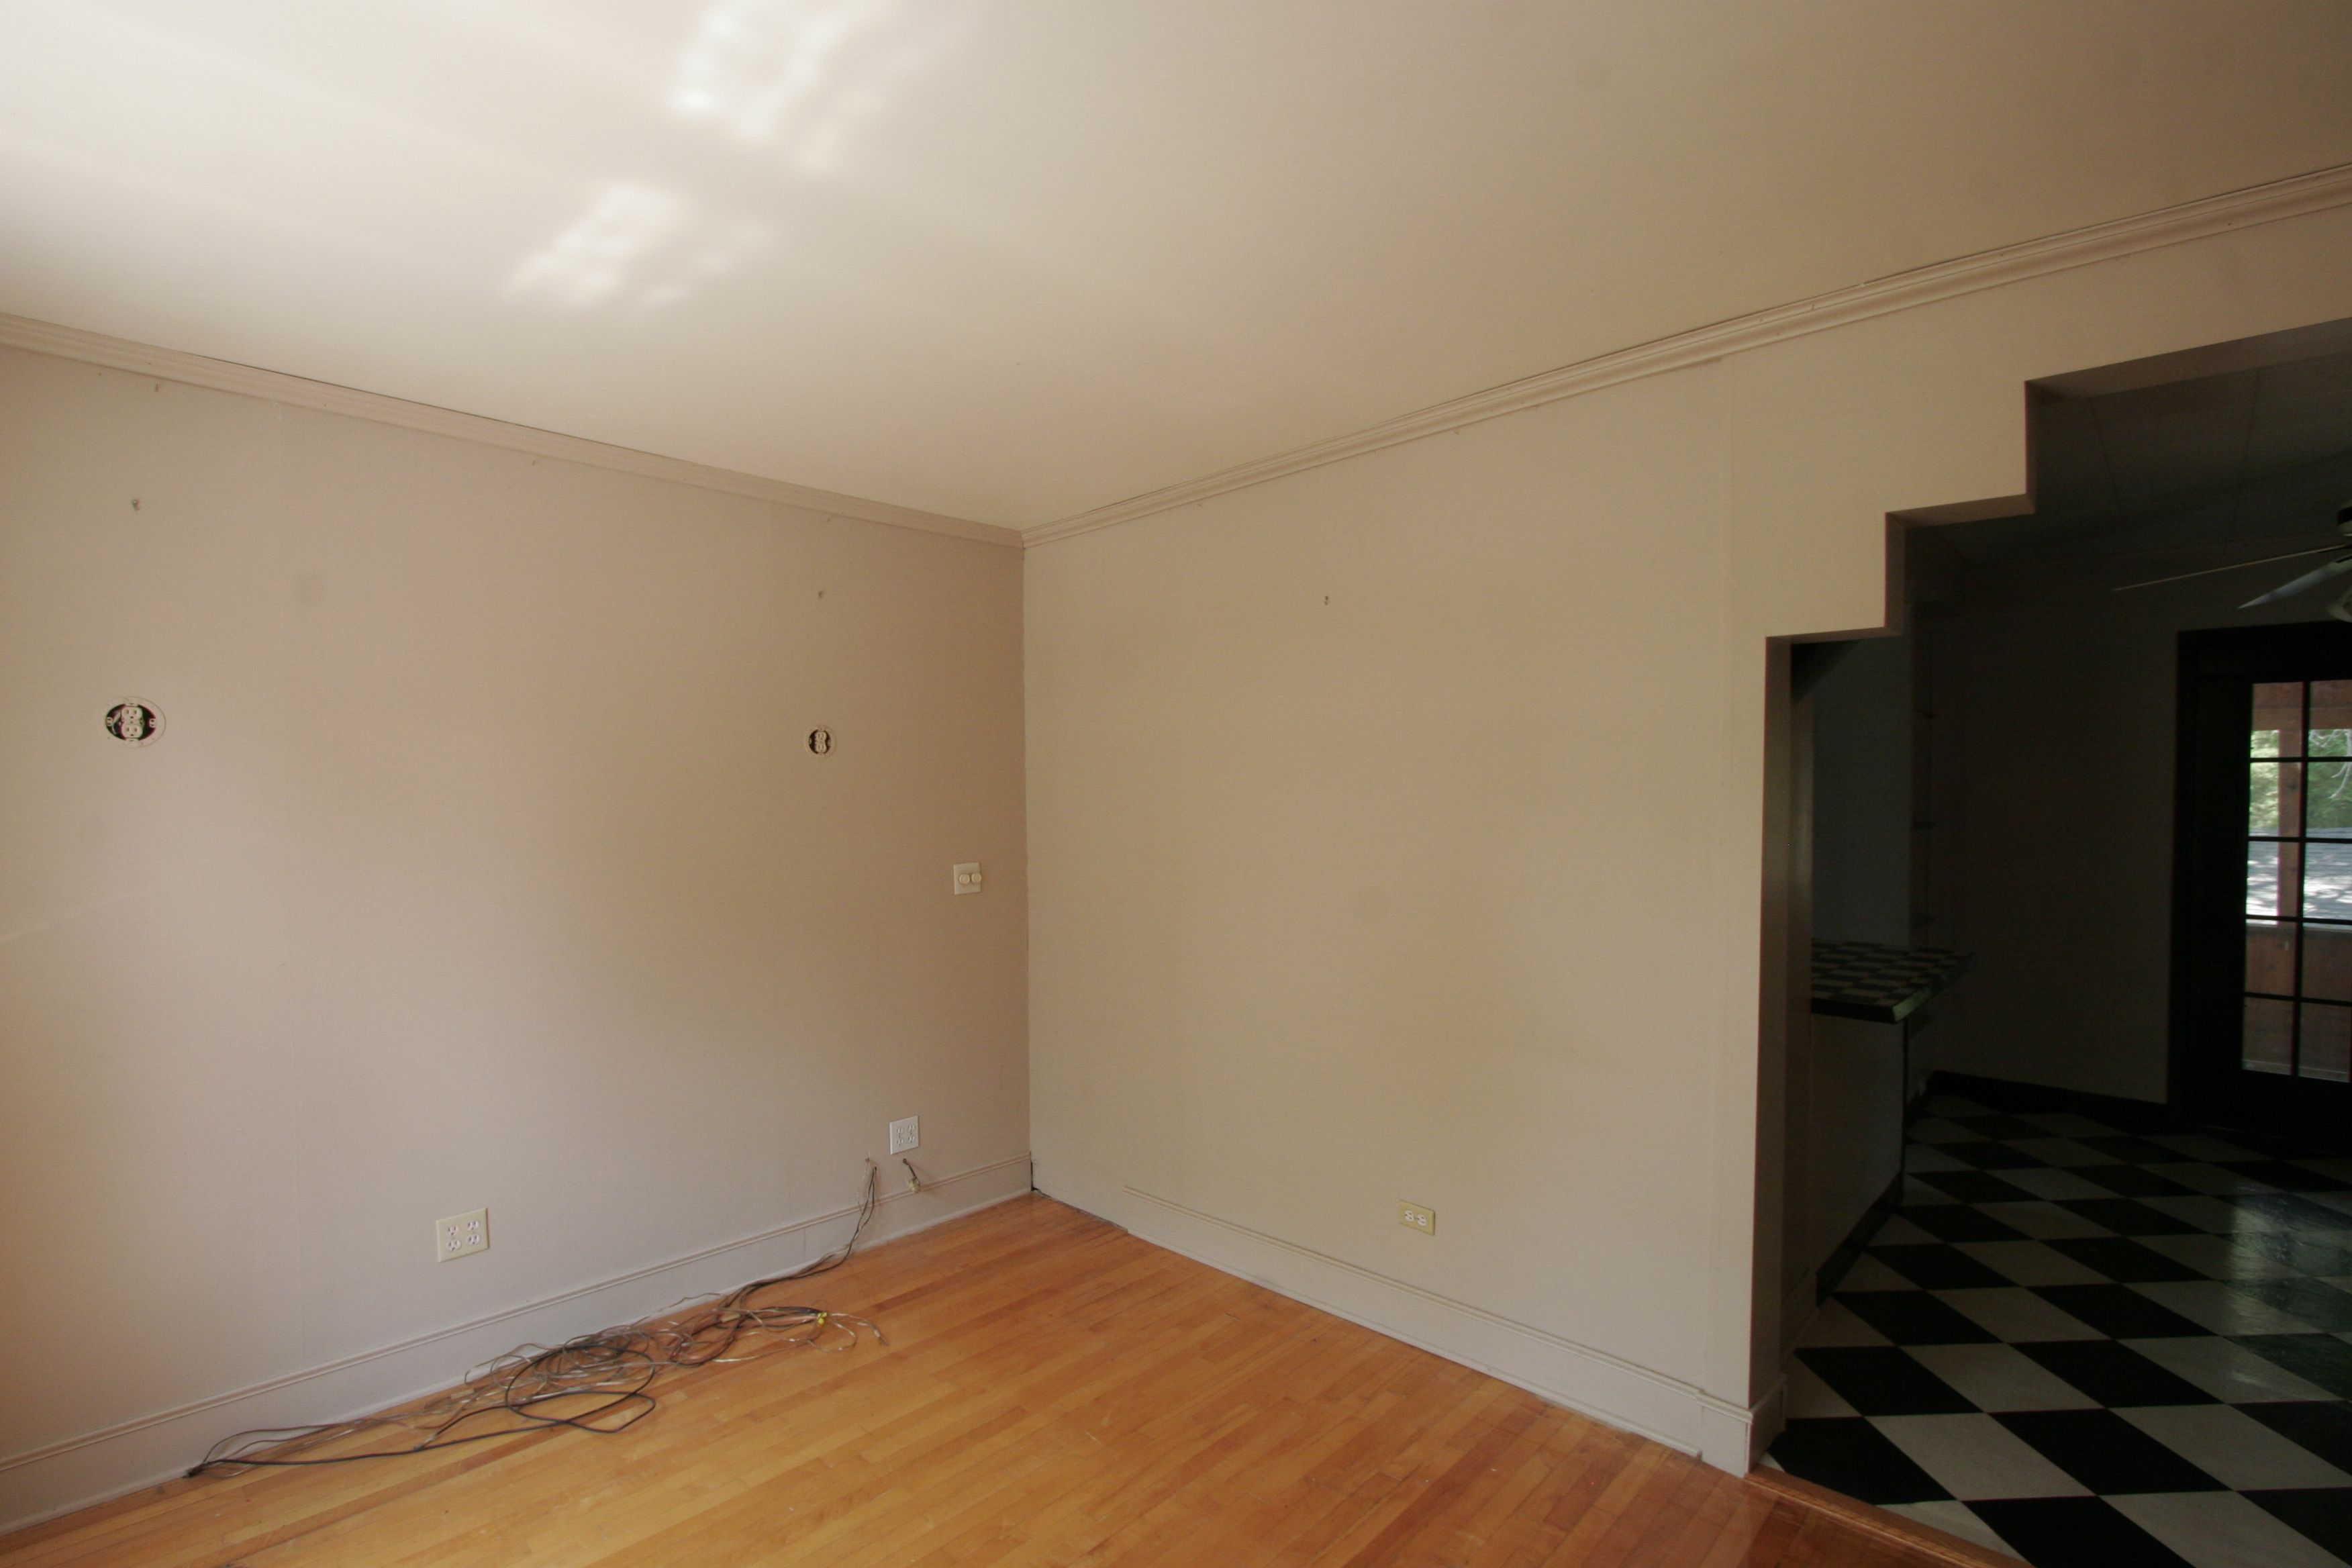
The markings on the left wall are electrical outlets, installed at these locations when the house converted from gas lighting.

This Odd House has been standing for over a hundred years.  Its walls have been painted, covered, remodeled, and rearranged.  They hide a history of technology evolution.  As we open them up for this round of renovation, we can piece together the clues revealed.

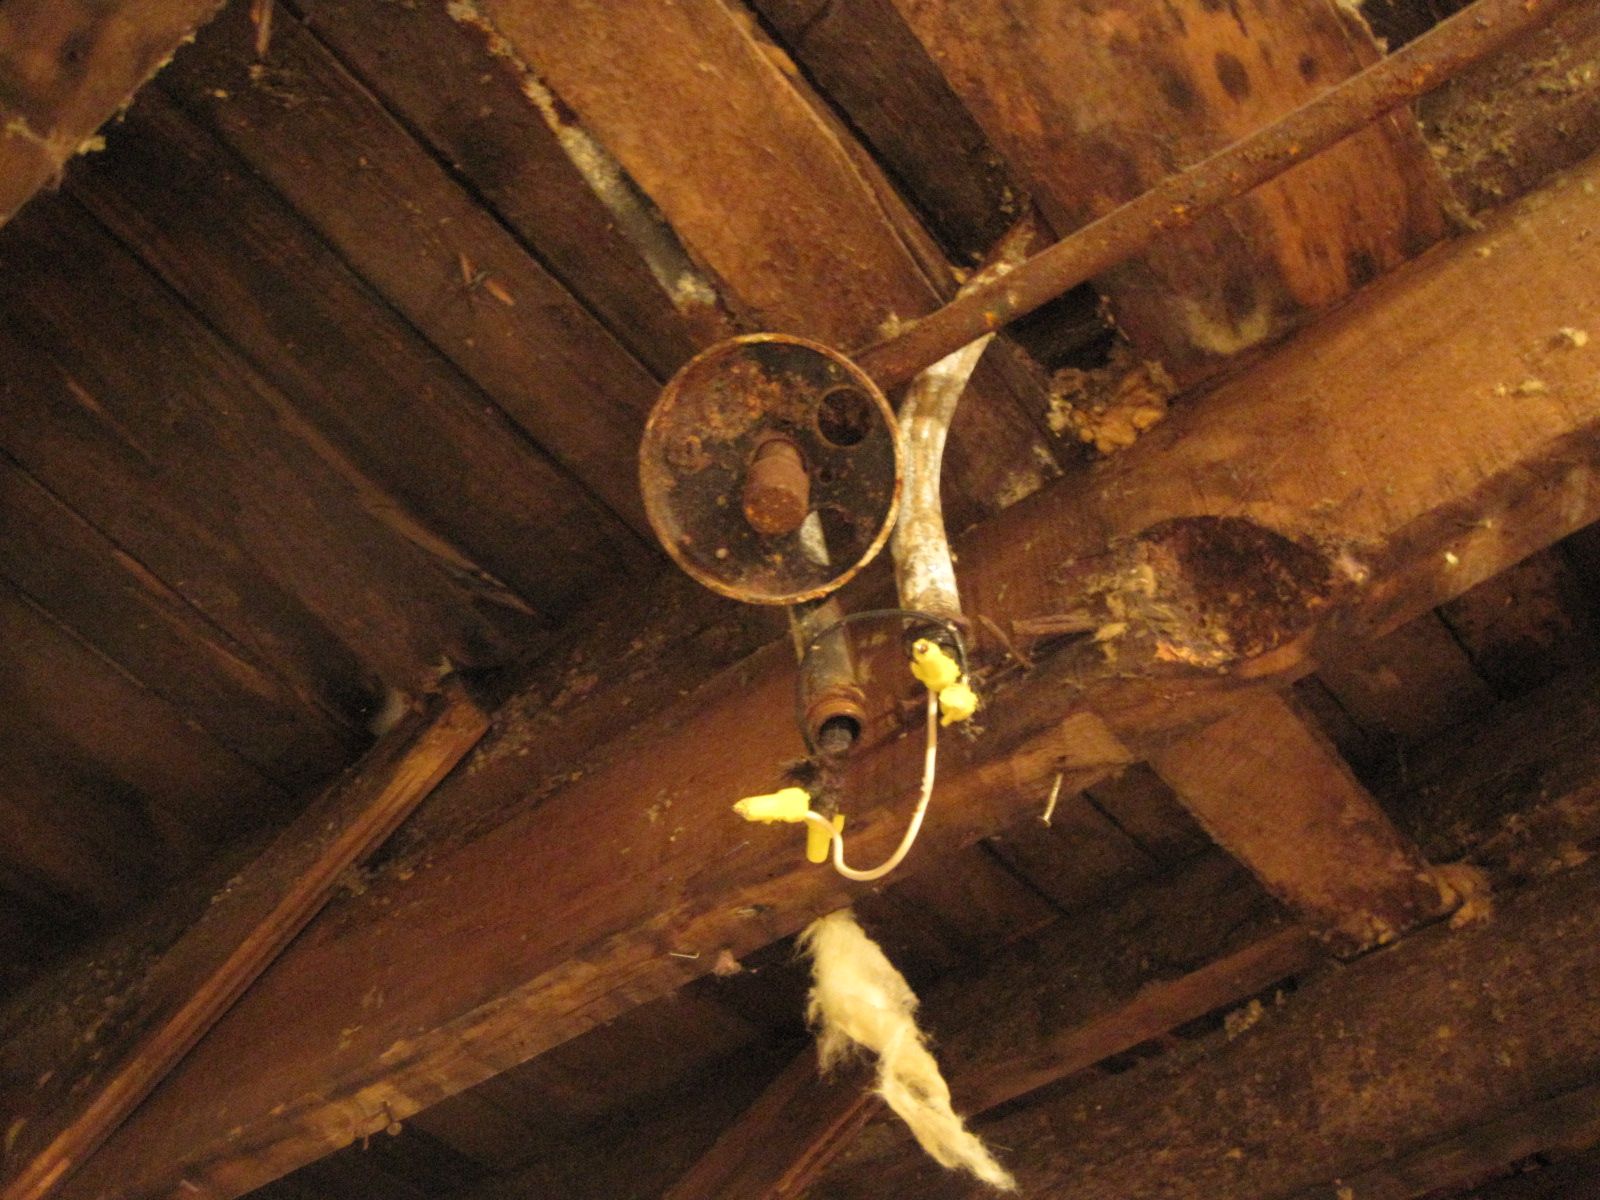
When it first was occupied, indoor lighting was provided by lamps fueled from gas lines.  A remnant gas pipe was found above the bathroom ceiling, since capped off, but originally it fed two wall sconces in what is now the living room.

A capped off gasline, next to two electrical conduits, found above the ceiling of the bathroom.

When the city converted to electrical power for lighting, the wall sconces were replaced by electrical outlets, probably an obvious substitution at the time, even if it seems like an odd position for outlets today.

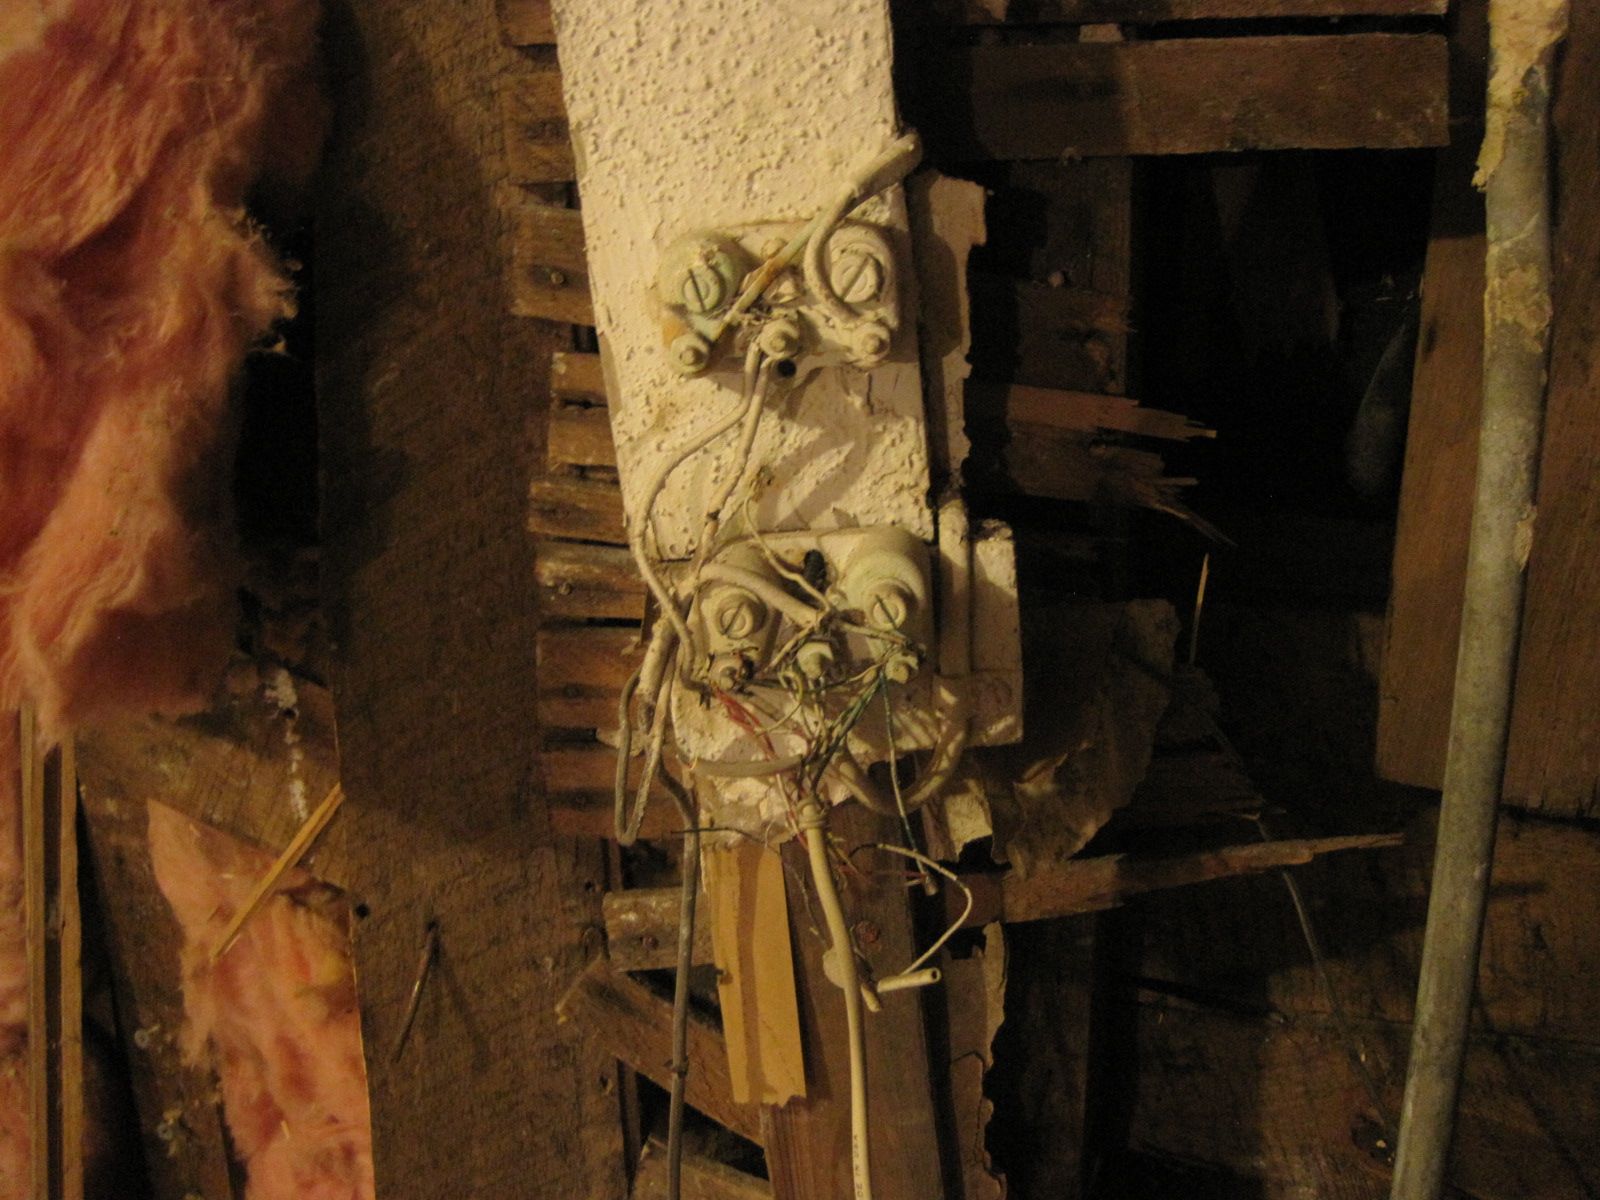
When the house was built, a telephone network existed, but phones were expensive and probably not common in individual homes.  Eventually of course, telephones became an essential part of life and the house was wired for them.  Today the lines come in at the back of the house on the second floor, and wires are routed through tortuous paths to nearly every room.

The phone lines entering the house. There are two sets servicing what was once a duplex. They will be abandoned in place.

Today I find myself in the company of twenty-somethings, having a cell phone but no landline.  At the risk of not being able to escape the Matrix, I am pulling out the four-wire phone cable and jacks (including the ones in the bathrooms).   This goes against all of my engineering instincts, wanting to preserve any and all functionality in case it is needed for some unanticipated need or support call.   I console myself by recognizing that in the event of a future technology reversal, I can run wires to the dial phone abandoned in the basement by the previous owners.  Phones come, phones go.

Posted in Uncategorized | Comments Off on Technology comes, technology goes.

Renovation Hazards

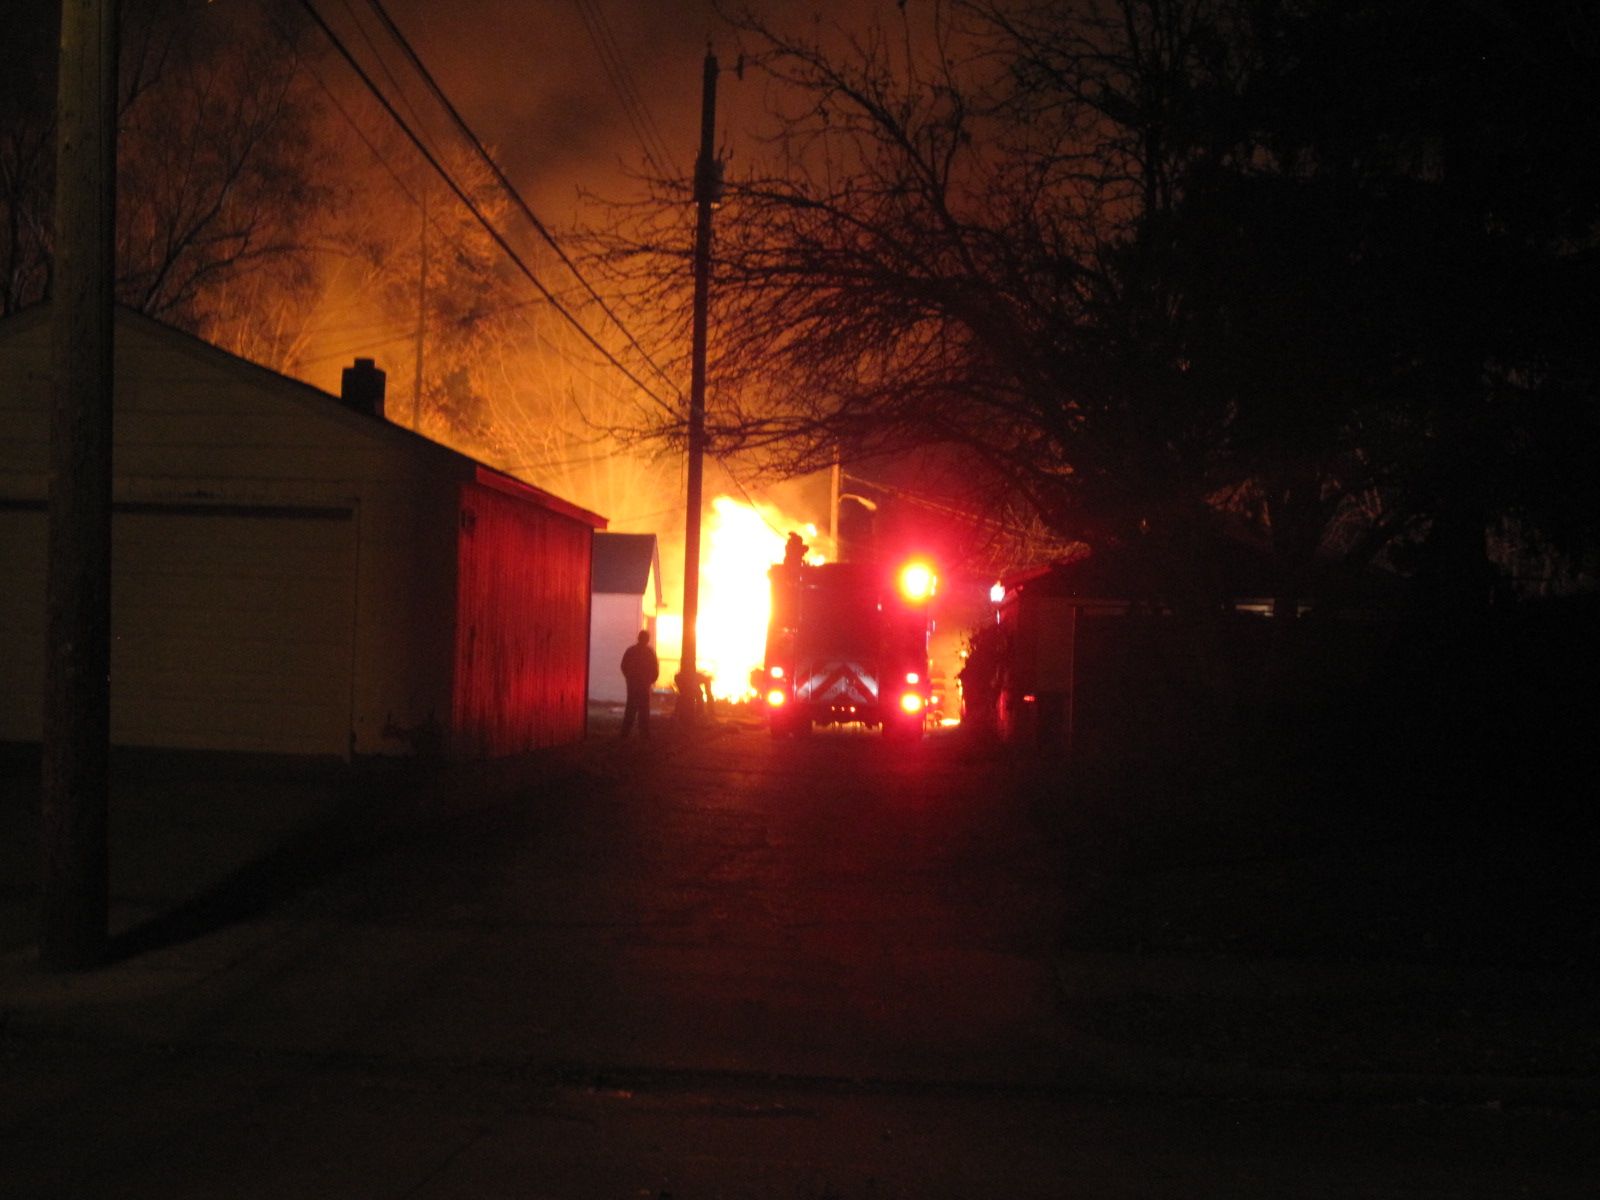
A garage on fire five houses away.  This could have been MY garage!

A disturbing episode happened last night.  A neighbor came to the door to say that there was a fire in my driveway, did I know about it?  I was shocked, and rushed out to see that the construction debris, accumulated in a dumpster and in my  driveway from the window replacement and renovation demolition, was blazing and spreading in the brisk wind.

I ran back to the house to fetch a fire extinguisher and blasted it on the fire.  Five seconds later, the extinguisher was exhausted, but the fire was merely diminished.  The neighbor brought another extinguisher, and another 5-second blast brought the fire down to glowing embers.  Still not out, so buckets of water were filled and applied.

Meanwhile, looking down the alley, a blaze had erupted from a garage a few houses away.  Fire sirens had sounded earlier, but seemed to have gone elsewhere.  I called 911 to report the garage fire.  The flames went high, licking the power lines and trees, and it seemed forever before the firetrucks arrived.

Today, I see that the garage down the alley was burned to the ground.  There were construction materials nearby, a stack of scorched trusses suggested that the garage was being repaired or replaced.  Could it be that someone was cruising the alley, torching anything that looked like construction debris?  I didn’t really expect that this would be one of the hazards of renovation.

Oh, and one more lesson:  those home fire extinguishers may be good for small kitchen grease fires, but they just didn’t match my hollywood-derived expectation of how they would work in this situation.  I guess it is unreasonable to expect them to quench a garage fire, but I really thought there was more in them than I saw.  I will be replacing my spent fire extinguisher (and my neighbor’s) with one that has a higher capacity.

Posted in Uncategorized | 5 Comments

Windows 2.0

This gallery contains 25 photos.

The windows in This Odd House have a long history.   I have been able to piece together parts of it.  And now I am about to become a part of their history. The building started out as a store with … Continue reading

More Galleries | 2 Comments

Fishing Cable

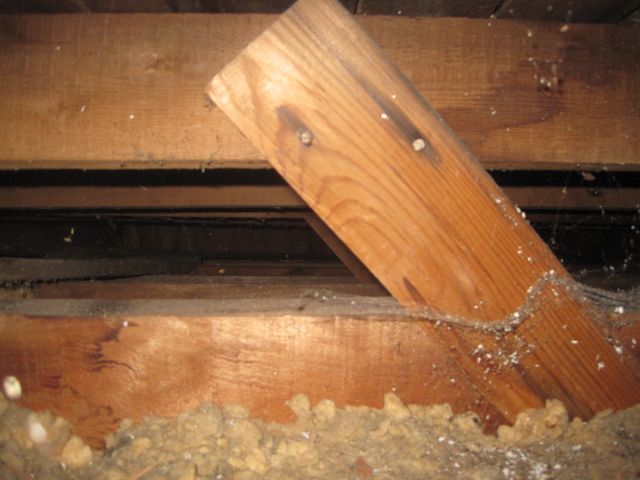
The attic of This Odd House. Eight to twelve inches to hold a little blown insulation that keeps the spiders warm. This view is from the opening revealed when the chimney was removed.  Now, how to run a wire to the far end?

A while back I was suffering from a crippled connection to the internet.  The Comcast technician came to figure it out.  Hours later, after re-wiring from the pole to the basement, bypassing the nest of previous cables and splitters, and then routing up the (former) chimney and connecting to a cable outlet he found in the upstairs living room, he concluded that the problem was not the cable.

I had installed a new cable modem and new wireless router, both acquired from the “special deal” offered by Comcast when one signs up for new internet service.  The problem turned out to be the router- it was throttling the bandwidth down to kilobits per second from the megabits I had purchased.  Replacing the new modern router with my older one restored my connection.

I tell this story only as background.  The prior owners had routed cables around the house for various purposes, but none were routed anywhere near where I am setting up my “media center” in a second floor bedroom.  So I had no way to connect my television to the cable service without routing cables along the floor tucking them next to the baseboards.

Since moving in, I have been living commando style subscribing only to the internet service, foregoing the engaging but time-sinking cable channels.  This has not been a major sacrifice over the summer, and I have been more productive because of the lack of program options.  I have a UHF antenna that I can pick up terrestrial local broadcasts for critical stuff.  There hasn’t been any.

Modern televisions and AV equipment, in addition to being connected to cable, are also internet-connected, and my plan was to have the “media closet” contain all that stuff, tucked behind the display.  The modem and wireless router would also be there, a central dispatcher for the house.  But first I had to get the cable there.

I didn’t like the idea of snaking cable along the wall baseboards.  So how to do it?

The removed chimney provided a portal that exposed the “attic”.  Most people think of attics as being the space under the roof, above the top floor ceiling, in which old furniture, steamer trunks, and great-Grandma’s Civil War love letters to great-Grandpa are stored along with his bayonet rifle and sword.

In a house with a flat roof however, there is no such luxury of space.  There is about a foot of height, diminishing from one end of the house in order to provide a slanted surface on the roof for water to drain at the far end.

I could see into this narrow space.  To their credit, it had been partially filled with blown-in insulation by the prior owners.  A flashlight revealed the ceiling rafters and supports and the central beam that was the spine of the house.  I could almost see to the media room.  Maybe I could run a cable across the ceiling over to it.

I liked this idea; it was conceptually simple, just run the cable over the ceiling.  This is one of those things that is easy to specify, but challenging to execute.  I had a distance of 15 to 20 feet involved.  I could reach a few feet in, and with my Pikstik reach extender get another two or three, but this was far beyond.  I could try inserting the cable from my opening, but even though the cable is somewhat stiff, it still ends violating one of the two basic lessons of physics class (F=ma, and “you can’t push on a rope”).

And yet I had to believe that electricians and cable guys do this kind of stuff all the time.  How do they do it?  Well, they have specialized tools.  I actually own an electrician’s fishing wire, but it was designed to pull wires through conduit, an older wiring technology now replaced by nonmetallic sheathed cable (“Romex”) http://homerenovations.about.com/od/electrical/a/artromexnm.htm .  The fishing wire does not work well in open space (too springy and with a strong coiling curve).   A professional might own a tool like this, a telescoping pole. (http://www.specialized.net/Specialized/Cable-Telescoping-Fish-Pole-Greenlee-Communications-24-3300.aspx), but I didn’t want to spend hundreds of dollars on this for a single use.  I’d rent one, but did not find one at the local rental outlets.

But surely other things could work.  It occurred to me that I wanted some sort of lightweight pole that was stiff, but could have a little flex, maybe a fiberglass rod, or aluminum tube.  Where had I seen such items?  Of course!  My tent had long poles that provided its support, but collapsed down to segments that inserted into each other.  A bungee cord held it together when assembled.  Maybe I could connect two of the tent poles, with masking tape if necessary, and make the reach.

Well, it turned out that this was a successful idea.  I cut a hole in the ceiling of the media room closet, my eventual target.  From the other end, the attic portal, I then “pushed” the tent pole into the chimney access of the attic aiming it toward the closet, snapping successive pole sections into the previous as it progressed.  A little finessing across the joists and past some conduit obstacles and eventually the entire pole was extended and spanning the distance into the dark recess.  Remarkably, looking up into my ceiling cutout revealed the shiny surface of the far end of the tent pole!

From there it was a relatively simple matter to tape the cable onto the end of the tent pole and then pull it back.  Cable service directly to its destination!  The last 15 feet of the last mile.

Posted in Uncategorized | 1 Comment

To draw a bath, the continuing saga

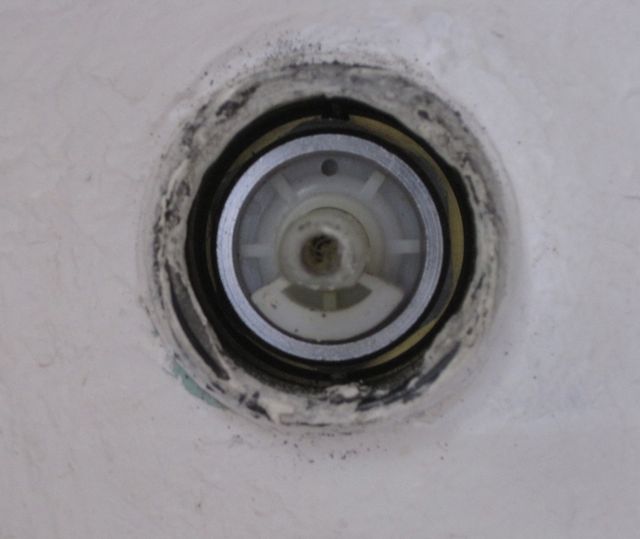
The recessed Delta faucet cartridge.

The Jacuzzi technicians had fixed the leak by converting the drip behind the tub into a drip into the tub.  Now all that was needed was to fix the leaking faucet handles, a task every homeowner has encountered in their tenure.

In principle, it involved removing the decorative handle, and replacing an O-ring, or in the case of more advanced designs, a “cartridge”, and then reassembling.  There are plenty of references online.  Just type “how to…”, and select “fix a leaky faucet”, it will be near the top of the offered choices.

Yet, my situation did not seem to be among the links offered.  I finally found an example that seemed similar, a Delta faucet.  All I had to do was replace the cartridge with the one I acquired at the local hardware store.

It took me a while to figure out how to remove the old cartridge.  It is held in place by a retaining ring, a hex nut that any socket wrench of the right size could unscrew.   I didn’t have that size, but I obtained one at the same local hardware store (those large sockets are expensive!).  I had everything I needed and headed home with confidence.

But the socket did not fit.  It might have been the right size, but it was too “fat”.  It would not fit into the cylindrical recess containing the faucet cartridge.

I continued my research.  It turns out there are specialized plumber tools designed for just such a situation.  They are called “stem sockets”, thin walled socket wrenches for removing faucet stems just like the one I was working on, and one could even find them at a Home Depot center.  There are complete sets of such stem sockets, so not knowing what size I had exactly, I bought an entire set.

But it was for naught.  I tried every one and they either were too small to fit on the hex nut, or too fat to fit in the hole.  Once again, the amateur installers had failed to consider subsequent maintenance, assuming that a faucet valve would stand the test of time, blocking every last water molecule forever.

I realized that I had reached the end of my personal resources.  I made one last attempt, an appeal to a professional, the team that had installed my new boiler.  I described the situation, sent a photo of the faucet, and begged for advice.  The response I got was not encouraging.  The professional plumber recommended “getting at it from behind.”

So it appears that some excavation and demolition of wall sections will be the next step in fixing the Jacuzzi drip.  I’m living with it for a while until it gets a little higher on the renovation priority list.

Posted in Uncategorized | Comments Off on To draw a bath, the continuing saga

To draw a bath, part 2, continued.

The drip behind the Jacuzzi had been diagnosed and the remedy required pulling the tub out temporarily to replace some plumbing underneath it.  The spa winterizing season had consumed all available resources from the company that does such work, so I had to wait a week until there was an opening in the schedule.  During this time, I shut off the water to that part of the house.

Finally, my turn on the schedule came up and two plumbers arrived in the morning.  They had to reassess the situation and now there were clearly two separate opinions.  Here is a snippet from the troubleshooting dialog:

“I’ve seen stupider.”  This was the new plumber who hadn’t seen this tub before.

Some debate ensued, especially when they found that the tub could not easily be disconnected from the drain, by virtue of the installation by amateurs who did not anticipate ever having to service the system.  The argument was over the nature of the leak:

“Take a number-four plug and apply a little back-pressure to find out where the leak is.”

“Are you crazy?”

“Ok, a number-five then.  But then you won’t be able to orient the drain right.”

“Doesn’t matter.  I guarantee you won’t draw a dribble…”

It went on like this for quite some time, talking and arguing in plumberese.  Eventually, they dismantled the spout, then reassembled it, with a silicone sealant that cures even underwater (I tried to find out how it does that, but they weren’t telling).  Several days later, I was allowed to turn the water back on, and check for leaks.

It seemed to have solved the drip under the tub; there was no evidence of water after another day of waiting and watching.  The leak is still there however, but it now drips into the tub instead of behind it.

This has now become a classic case of a leaky faucet.  All I have to do is replace the O-rings in the faucet handles and there will be no leak anywhere.  How hard can that be?

Posted in Uncategorized | 3 Comments

Feathering My Nest

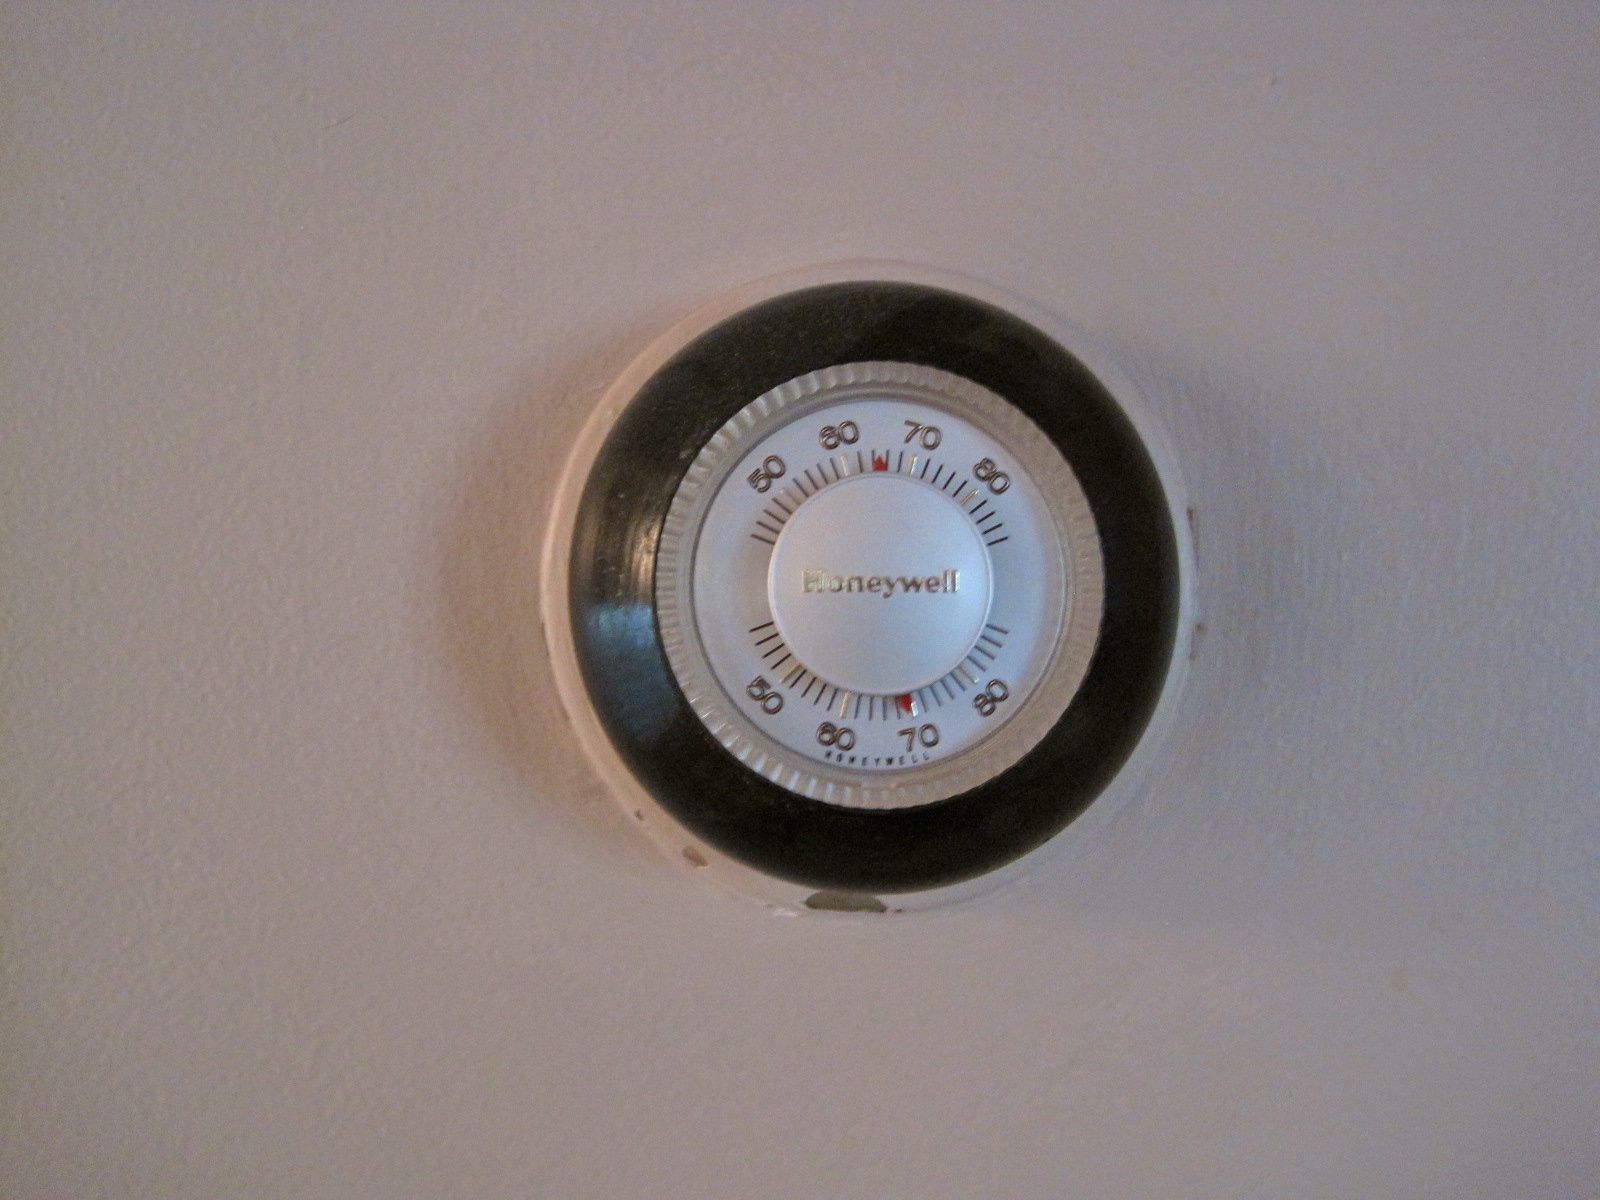
The original 2-wire Honeywell thermostat in This Odd House.

I had the pleasure recently of installing a new thermostat.  This is not the normal response to installing a control for the unglamorous heating infrastructure of a house.  And I even had some difficulties in getting it up and running.  Yet I am still marveling at the experience.

One of my goals in the renovation of This Odd House is to bring an old dwelling to become an energy efficient citizen of its community.  To this end I have updated the heating system so that the fuel it consumes is turned into useful heat and hot water at a 95% efficiency level.

We can obtain a further efficiency by burning that fuel only when it matters, namely when there are people in the house that care about the actual temperature.

I had seen a thermostat at my cousin’s home when I visited her in CA last winter that I was quite impressed with.  I was aware of “smart thermostats” that have been around for decades which can be programmed for daily schedules.  I have previously owned Honeywell “Chronotherms” (both -1 and -2 models) that I configured for weekday and weekend timings, and I have heard of others which try to learn from your daily thermostat manipulations.  But this was way beyond that level of technology.  This thermostat was internet-connected.

It is called “Nest”.  And when I opened the packaging, I felt the same experience as opening a box containing an Apple iPod, or iPhone, a sense of privilege at taking ownership of a very high-class, beautifully designed product that would not only meet the functional requirements, but provide an esthetic satisfaction while doing so.

This is a design attribute that the American market does not fully appreciate.  Our cultural heritage emphasizes function over form, a reasonable priority when one is at the margins of surviving the winter.  Europe, on the other hand, has long appreciated the styling of an appliance as an additional important aspect to its function.  For whatever artistic and engineering reasons, I often prefer the European designs for kitchens and the appliances they place in them.

The Nest is not European, it is entirely a US design, and, as it turns out, from engineers that came from Apple and its product design and user experience philosophy.  It shows.

I won’t extol the Nest features here, you can investigate at will, but I will say that I am looking forward to it learning my schedule, anticipating my temperature preferences, and allowing me to control it remotely (via phone or internet).  And I am already convinced that it is the most beautiful thermostat anyone has ever seen.

The Nest, a next generation thermostat.

Of course, installing it in This Odd House was not without problems and setbacks.  My old thermostat was a classic circular Honeywell unit with a mercury switch on a bimetallic spring.  The spring shifted with temperature and the vial of mercury tilted to make or break the connection to the furnace.  Three wires ran to the thermostat, but only two were connected, so this is a two-wire system, the wires either shorted together via the mercury in the switch, or open.

The Nest thermostat is smart; it has a computer inside it and it needs power to run.  The designers provided a battery, just like a cell phone battery, to power it, and be recharged as needed.  The recharging happens from the thermostat wires themselves.  It turns out that thermostat wires have low voltage (24 volts) to signal the furnace to turn on or off.  When the thermostat is not calling for heat, the 24 volts is available for other things, like recharging a battery.

The use of the 24 volt thermostat line when the furnace is off is called “power stealing”.   It is a common feature of smart thermostats, but it has its limitations.  My new boiler sensed the wires and determined when it was being asked for more heat and when the heat target had been met.  I found that the Nest was stealing so much power during the off cycle, that the boiler thought more heat was being requested.  My house heated to 78F even though I only asked for 68.

Fortunately the boiler “faulted”  (I don’t know exactly what this condition is, but I think it is the recognition of asking for more heat than is believable, based on other sensors), and the heating runaway was averted.

It took several days to figure out that this was happening.  And the fact that I have cast iron convection radiators makes for a long time constant delayed response.  The proposed solution is to convert the system into a 3-wire thermostat, which adds a ground (“common”) wire.  Now the Nest could steal power without affecting the sense wire.  I am currently in the confirmation phase of this experiment.

I’d previously done some development of visual systems for displaying energy usage and management but it was premature and incomplete.  I am thrilled that a company has successfully created a device consistent with my ideas back then and extended it to take full advantage of being internet-connected and to work in our new mobile world.

Posted in Uncategorized | 5 Comments

To draw a bath, part 2

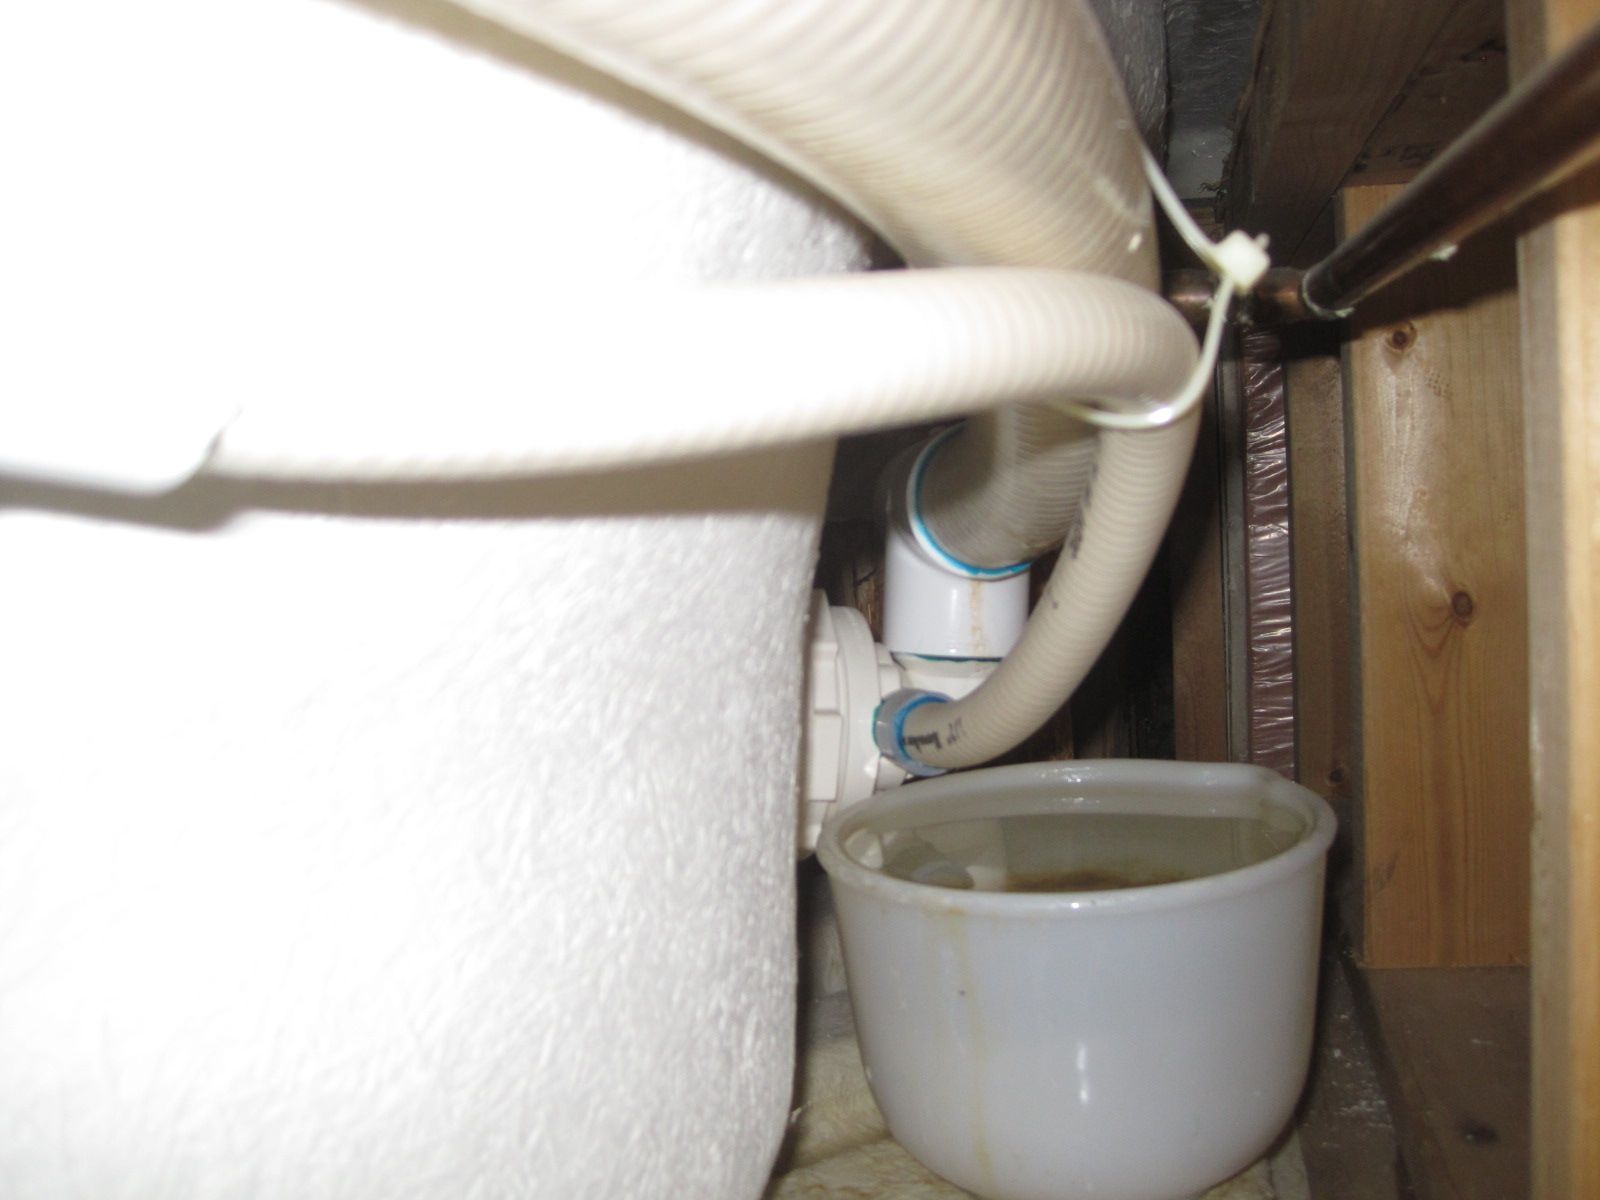
A subterranean shot behind and under the Jacuzzi tub showing the overflowing catch basin. This view does not show the pumps and plumbing that trapped the bowl in this position.

I had previously declared the Jacuzzi tub portion of the renovation to be successful, but the other day I noticed a couple damp spots on the carpet (why does anyone put carpet in a bathroom?)   I thought I had spilled or splashed something, but when it didn’t dry off in a few hours, and in fact another spot showed up, I became curious.  The likely culprit was the plumbing under the tub.

There was an access port the size of a heating vent (Inspector 7 had noted it was inadequately sized).  After a session with a flashlight I saw a bowl that had been installed at a strategic position to catch a slow drip forming under the faucet (to his credit, so had Inspector7, but through willful denial of the evidence, I seemed to have ignored it).

Evidently this was the solution to a leak discovered after the tub was installed.  Let it drip into a catch bowl and it would evaporate away.  This solution worked for almost twenty years, but now the leak had worsened, and the drip rate now exceeded the evaporation rate.  The bowl filled up and now was overflowing onto the floor and seeping under the carpet.  I’m now wondering if I should have avoided using the tub.  Nobody told me it was just for show, and that the plumbing seals were fragile.

I looked for the shutoff valves that one finds at every sink, tub or toilet.  Finding none, I went to the basement to look for the main valves.  There had been a set controlling the pipes to the second floor (for when it was a duplex).  They also turned off the master bathroom water supply.  Everything except the hot water to the tub.  I had to locate some other valve to turn that one off.  It seemed odd that everything in that room would be controlled by the shutoff except for one connection, but I am becoming inured to such anomalies.

The drip didn’t seem to stop, despite the upstream cutoff.  Perhaps there was water in the pipes still providing gravity feed to it.

My next problem was how to empty the drip basin so I could stop the flow under the carpet.  The bowl was out of reach.  I enlarged the access port from a few inches to a full foot square so that I could insert an arm and head to explore the bowels of the Jacuzzi.  I enlarged it further, but no opening would be large enough for me to reach that bowl.  No, I needed some way of extending my reach without exceeding my grasp.

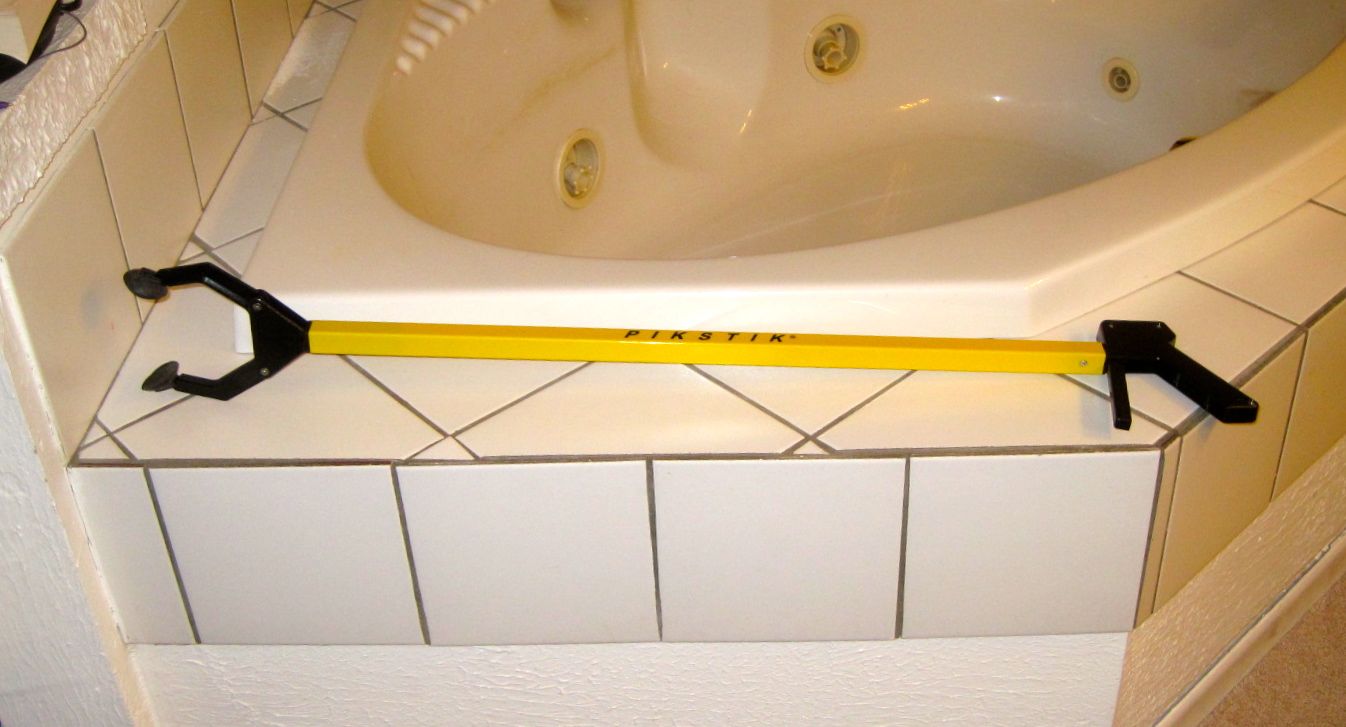
I now came to a sudden understanding for the existence of a tool that I had always ridiculed.  I could not understand the use for a “reach extender”, a gadget with a clamp that was a foot or more away from the handgrip.  Squeeze the handle and the clamp closed.  These things are popular with older people, but I never knew quite why.

Well, now I know.  It is for reaching in to the plumbing under a Jacuzzi tub in order to pull the drip bucket close enough to be able to bail it out.  Note that I could not actually pull the bowl out—there were pumps and drains and other plumbing obstacles.  But I could get it close enough to manually dip a sponge into it and transport some water to my bucket.  After enough repetitions, the bowl was nearly empty and I could return it to its post for drip catching.  The “Pikstick” was essential for this task.  I would use it morning and night for the next several days until the spa service professional could come and assess the situation.

The PikStik, an essential tool for Jacuzzi tub owners, at least those owners of tubs-installed-by-amateurs.

He didn’t show up the morning he was scheduled. He arrived the next  day.  I learned about the fall rush of spa clients, all needing winterizing, and how service calls needed to fit into the scheduling.

He was a day late, but at least he could assess the situation.  The water feed to the Rainbow Spout needed to be replaced.  To do so required that the tub be decoupled, and disconnected from the water and drain, and then lifted up and out to access the plumbing.  The supply pipe would be replaced, and then the whole unit re-installed.

Ok.  That seemed like a big job.  What was the price of a Jacuzzi tub anyway?

Now that the work has been identified, it must now be scheduled.  The bathroom will be out of order until then.  I’ll have a posting a few weeks from now with an update.  At least I hope it will be only a few weeks.

Posted in Uncategorized | 2 Comments